A technique I like to show the beginner, improver or just plain nervous artist is one using simple shapes. I was introduced to this technique in my early stages of drawing and it has ‘saved the day’ many a time for when I was unsure of how to proceed on my chosen subject and by ensuring I had my drawing positioned well on my paper.
The trick is to learn to see shapes in your subject and to start off drawing the most dominant one first. For example many animals can be started with just two circles or ovals - one large one for the body and a smaller one for the head; though obviously the shape and sizes may vary depending on the animal and it’s pose.
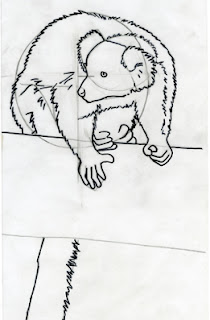
So here I’ll show a series of pictures that build up a lemur from the basic shapes to a finished line drawing.
In this case we are drawing a red-ruffed lemur.
This is the photo I worked from, showing the first shapes I saw in the drawing. When starting out it’s obviously easier to work from a photo, but with practise you can apply this technique to things you draw from life.
And drawing from life is the best way to learn… but that’s not always possible… how many of us have a handy lemur at home to draw?
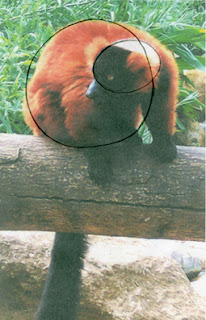
On your sheet of paper draw those two shapes roughly in proportion to one another.
Remember, by tracing you will learn nothing.
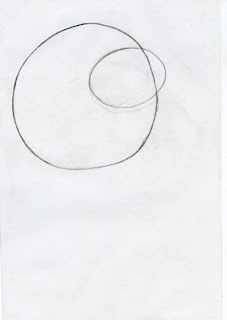
The great thing about using this technique is you learn to plan your drawing and by using the pencil lightly changes and adjustments are easily made. Its at this stage you can look at your two shapes, on your sheet of paper, and decide if where you have drawn them will leave enough room for the rest of the body and tail. If not, simply draw the shapes again in a better position. Because the pencils lines are light drawing them again won’t mess up your drawing unlike having heavy dark lines in the wrong place.
Next add shapes for the ears and muzzle. Don’t try drawing complicated shapes or detail yet. Keep it simple.
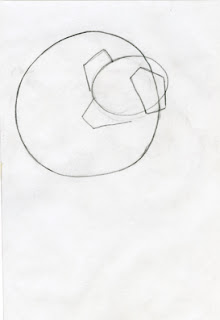
When adding limbs and features always look to see if a straight line vertically, diagonally or horizontally will line up with any other parts of the body – it makes it easier to know where to position them. In this case, I noticed that the top of the leg shape is as good as in line with the bottom of the head oval shape and the ear on the right.
Now add the bottom base line – notice that it does not come at the bottom of the circle. The circle is just a guide, so watch where parts of the body fall in, out or across its shape.
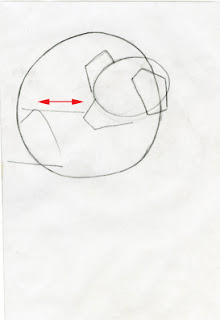
Draw in the front limb; notice that the top sits roughly on the line we used for the rear leg and the outside edge of the hand is roughly in line with the front edge of the ear. There’s no need to draw in the fingers just yet… remember keep it simple.
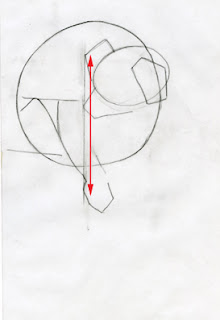
Taking note of the angle of the branch the lemur is sat on, continue the base line right across as you may notice the wrist of the lemur almost comes down that far. Draw in the line coming under the ear first, note that it starts just under the ears left corner. Once that line is in draw the line from the back down to the base line. Look at the photo and take notice of how far away from the ear this line should be drawn.
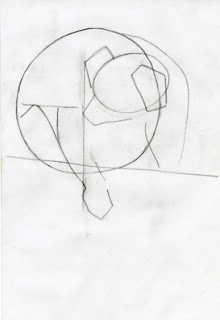
To help place the eye, look to see what it lines up with vertically and horizontally. In this case I can imagine lines from the point where the muzzle shape meets the head (horizontal) and from the point where the back of the ear on the left also meets the head (vertical).
Also add the shape for the hand on the right.
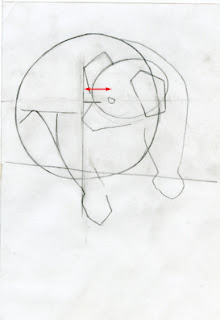
Next see how the line of the back flows in and out of the body circle line and draw that in.
Also add the line where the back foot sits, taking note of the shape of gap between the foot and arm.
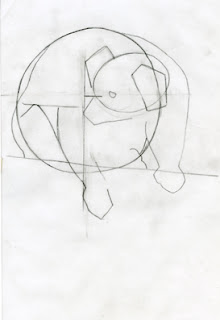
Lastly draw in the line under the chest and down the right forearm, put in a little shape for the nose, draw in the bottom line of the branch and then the tail.
And to finish off, draw in the fingers. Now we have completed our plan of our lemur. Before diving in and putting in detail and shading do a final check to make sure you have everything in the right place and in proportion to each other. If anything looks wrong you can easily correct it at this stage.
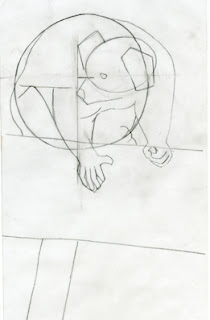
Once you’re happy, you can then take the drawing further by refining your lines, adding details, shading and colour if you wish. This is the stage where you can take your time and put as much work into it as you want.

5 comments:
Thank you this has been useful.
THANK YOU SO MUCH!!! It actually turned out very good! You're the best. :D
Thankyou!! I had looked all over the web to find a simple way of drawing a lemur and this is exactly what i was looking for!!
you are one of the best mine turned out great THANK YOU Soooo MUCH!!!!!!!!!!!!!!I love your drawings and I hope you do more alot more.This would mean so much to me.
thank you this helped out with my animal report i was just looking for a simple way to draw a lemur and this actually turned out a lot better than i suspected.
Post a Comment